Fort Gilkicker During World War Two,
Stokes Bay and D-Day Preparations
The Second World War
Fort Gilkicker seems to have been unmanned for the period up to the Second World War but the married quarters may have been occupied by families of the Royal Engineers stationed nearby. Trinity House had a small observation post on Fort Gilkicker after 1939. This was manned twenty four hours a day. In 1939 the narrow gauge railway was removed and its metal presumably used for the war effort. Its route is still visible from the top of Fort Gilkicker. After Dunkirk it was decided to surround Great Britain with a ring of Emergency Coast Batteries. The first to be installed were manned by the Royal Navy and Royal Marines. The Coast Artillery soon replaced them. Many coast defences were supplemented with ex-naval guns as part of the anti-invasion defences. Searchlights were installed for night attacks. The Royal Engineers mounted a mobile searchlight on a purpose built platform on the top of Fort Gilkicker, west of gun position B1. At this time or shortly after Gilkicker was also reportedly equipped with a twin Vickers and possibly a 20 or 30 millimeter gun forward of the old 6inch gun positions. In the early years of the war an eye witness reports seeing a triple generator, which he referred to as ‘Pip, Squeak and Wilfred‘, mounted outside the fort. This provided power for a radar set. Pip provided auxiliary power, Squeak supplied the listening device whilst Wilfred supplied the network of wires which were spread across the field to the rear of the fort. Subsequent research has failed to find any more information about this generator.
D-Day and The Fort Gilkicker Signal Station
The requirement in the summer of 1943 to provide a suitable staff organisation for reloading, repairing and storing the numerous ships and craft that would take place in any future combined operation in the Channel resulted in the setting up of a TURCO (Turn Around Control) at Portsmouth, another at Portland, Weymouth and Poole, with a third at Newhaven, Shoreham and Littlehampton. The one at Portsmouth dealt with the Isle of Wight area. It was decided that in order that the Portsmouth TURCO should be able to maintain a clear picture of the situation, and be in a position to give orders to ships and craft, it would be necessary to have officers stationed somewhere overlooking Spithead. A new signal station was accordingly constructed at Fort Gilkicker with a good all round view and an operations room embodied in the fort.
Early in April 1944 Radio Transmitting equipment was installed in Fort Gilkicker to provide emergency communication in the event of breakdown in land lines and for communication with the Solent Patrol vessels employed on traffic control duties. As part of Operation Overlord and important station was erected at Fort Gilkicker to take the place of an obsolescent station at nearby Fort Monckton and it became a key part of the V/S (Visual Signals) communication system. Gilkicker also housed a Principal Collecting Officer with associated telephone installation and teleprinter. His duties were concerned with the Stokes Bay ‘Collecting Area’ where L.C.T.s (Landing Craft Tank) could proceed, on return from the far shore landing area, and be inspected and their wants ascertained. It was also decided that a maintenance organisation would also be necessary in Collecting Areas. An organisation, integral with that of the Principal Collecting Officers was set up at Gilkicker to carry out short term maintenance, first aid repairs in the collecting areas and survey of damaged craft, informing TURCO accordingly. Up to 31 July 1944 maintenance parties from Fort Gilkicker serviced 1300 L.C.T.s, 250 L.C.I.(L) and 50 L.S.T.s a total of 1,600 jobs done.
L.C.T. = Landing Craft Tank (3 to 6 tanks) Picture and details
L.C.I.(L) = Landing Craft Infantry (Large) Picture and details
L.S.T. = Landing Ship Tank (60 tanks) Picture and details
A ‘Report on Communications at Fort Gilkicker during June and July 1944‘ shows that on June 9th. over 1,000 signals were recorded for the day needing routing to over 1300 addresses. Later an average of 800 signals to almost 1,000 addresses were routed via Gilkicker. In June an exhausted carrier pigeon arrived at Gilkicker from France with a message from an Allied Paratroops Commander. The message was despatched at once with the pigeon being victualled until collected by the local army pigeon unit. The fort made 3,670 issues of confidential code and signals books to landing ships and craft in the Stokes Bay and Gosport areas in the first two months of the operation. Also operating from the fort was No. 10 WT, No.15 Radar and No. 17 WD mobile maintenance units. In the first two months six hundred routine maintenance visits were made to all types of ships and craft. Offices in the fort were occupied by the Principal Collecting Officer, Assistant Berthing Officer, Principal Engineering Officer and Confidential Book Officer.
Stokes Bay, Phoenixes and D-Day
Stokes Bay was requisitioned by the War Office for the construction of a huge series of D-Day caissons called Phoenix units. An initial survey decided that there were two possible sites at Stokes Bay. Site No.1 at the east end of the bay was described as: Good expanse of approximately level ground. Some trimming would be required. Levels suitable and site sheltered. The rise and fall would limit draught of vessels launched but this may be overcome by launching partly constructed hulls. Site No.2 further to the west was described as: Similar but more restricted in extent. Useful for expansion or for the smaller units. Another survey noted that there was rail access but the rails had been taken up.
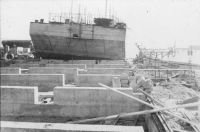
Construction of Phoenix units (concrete caissons) for D-Day was begun in December 1943. Fourteen type B2 units were constructed at Stokes Bay, Gosport. These formed part of the Mulberry harbour for the British landing at Arromanches, Normandy. The B2 units were partially submerged units that were towed out to the D-Day beach by tugs and sunk to form breakwaters for the floating roadways and pierheads. They were sunk where high tide would be about 10 feet below the top so they would always afford a barrier to waves entering the harbour.
147 Phoenixes of six different types in total were ordered. The largest of the Phoenixes, the A1 type, had a displacement of 6,044 tons, was 60ft high, 204ft in length and 56ft 3ins in breadth, formed of concrete. The B2 units were 203ft 6ins long, 44ft wide and 35ft high, divided into 22 compartments in two rows of eleven separated by dividing concrete walls 10ft thick at intervals of 16ft. The B2 type did not have anti-aircraft guns like other types and had sections at either end roofed over with concrete slabs. The largest caisson, the second generation Ax was 7700 tons. (I am grateful for the expertise of Chris Howlett who supplied additional information and corrected my own in the above text.) One document in the McAlpine archive states that a total of 25 B2 units were to be provided giving a total length of 4,895ft.
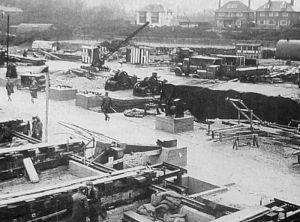
At Stokes Bay two contractors worked on the construction of the Phoenixes, eight by Holloway Bros (London) Ltd on the east site and six by W.C. French on the west site, each unit requiring 100 men to construct, a combined workforce of 1,400 men supplied by the Ministry of Labour and all accommodated locally, working 12 hour shifts for 2s/1d hourly pay. For security reasons the labourers working on the project were not told their purpose, although one man working on the Phoenix units at Stokes Bay reported in 2006 that he never saw a soldier or security of any sort and was easily able to cycle to and from his work into and out of Gosport. The Phoenixes were all constructed at the same time on the shore at Stokes Bay, parallel with the sea one behind the other on keel block walls on a raised platform 2M above the ground to allow them to be moved.
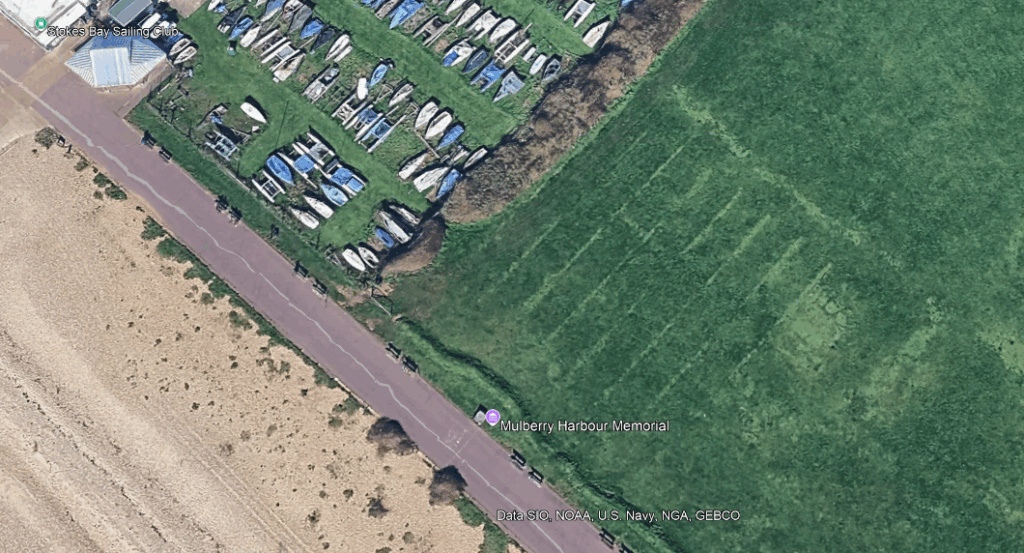
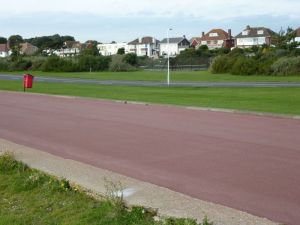
At Stokes Bay the two constructions sites were east and west of the present Stokes Bay sailing club building. An aerial view taken in 1944 shows six units on the western site, south of the modern children’s play area, one on the launch slipway, four more on shore waiting to be launched and one floating. At the eastern site east of the modern sailing club compound, the units were constructed in two rows, parallel to the sea. In dry Summer months signs of the concrete foundations on which the ball carriages ran can be seen as lines in the grass. (Six more B2 units were constructed at Stone Point Lepe and four more at Langston Harbour slipway, bringing the total to 24 constructed units)
Holloway, because of their experience at Conway, where the pierheads were constructed and launched, prepared details of the rolling and launching gear to be used by the other three contractors (W and C French Ltd at Stokes Bay, Wilson Lovatt and sons Ltd at Stone Point Lepe and Trevor Construction Co Ltd at Hayling Island Langstone) and to give technical assistance.

Because of the limitations of the site it was decided to construct four units in a line parallel with the sea and a further four inland of this.
The Phoenix caissons were rectangular in shape, the outer walls were of 15 inch reinforced concrete with transverse and longitudinal bulk heads of 9 inch reinforced concrete. This construction divided each caisson into 22 separate compartments which were grouped into suites of four and six for flooding purposes. Both ends of each caisson were formed into a swim end to facilitate towing. As an aid to stability the B1 and B2 units were constructed up to the full width of 44ft but above 20ft the width was reduced by 12ft giving a deck 6ft wide on both sides of the caisson. When floated the water line was at 12ft.
When the B2 units were 20ft feet in height and weighed 2,000 tons they were transferred to eighteen ball carriages, three carriages to each of six rolling track walls, using folding wedges and clamps. Each unit was then hauled forward using two steam winches and tackle until it was directly over a rolling track running parallel to the foreshore, where the weight was transferred from the ball carriages to a further set of eighteen carriages, nine on each of two rolling track walls using folding wedges as before. It was then winched along the rolling track until it lay over the sloping launchway, or slipway. In a similar manner as before the weight was transferred from the ball carriages to the launchway It was launched sideways down the slipway (launchway) into the sea at high tide.

To the west six units were constructed in a similar fashion by W.C. French. Because the site was narrower the units were in two rows with four units to the front and two behind.
The construction of the Phoenix units at Stokes Bay (and the intermediate pier units at Conway) were considered to be a world record for the controlled transportation of structures on the level. The Holloway Phoenix units were launched in March and April 1944.
The construction was completed whilst floating. A long pier was constructed at each of the two sites to enable the units to be moored. In each of the 22 compartments valves were fixed and the controls carried by special couplings and shafts which extended to a gangway which ran inside the caisson for the full length. This was for the purpose of flooding the caisson when placing the breakwater in its final position. Upon completion at Stokes Bay they were towed to an assembly point at Selsey or Dungeness and sunk ready for D-Day, so that they sat on the sea bed. In the days following D-Day the valves were closed and they were pumped out and refloated, then towed across the Channel to the D-Day beachhead where they were sunk to provide the breakwater for the Mulberry harbours.
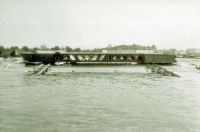
A disaster occurred whilst launching the first of the Phoenix units at Stokes Bay. As it was being launched it fell off the rolling walls and broke, killing three men and trapping fifteen other underneath it. The fault was thought to be due to sand, shingle and seaweed fouling the launchway and the Fire Brigade were called to hose down the launchway before subsequent launches. All further launches were carried out without any problems.
Phoenix types


Altogether 213 units were constructed made up of:
| Original type units | Supplementary | ||||||
| A1 | A2 | B1 | B2 | C1 | D1 | Ax | Bx |
| 80 | 11 | 31 | 24 | 17 | 10 | 30 | 10 |
147 were required for D-day made up of:
| A1 | A2 | B1 | B2 | C1 | D1 |
| 60 | 11 | 25 | 24 | 17 | 10 |
Two concrete Phoenix units can be seen at Portland. These are of the Ax type and were spares that were never needed.
Other spares (Ax types also previously stored in Portland) were taken to Holland in 1953 to block the breaches in the dykes made by the great storm. They have now been converted into a museum for the floods called the Watersnoodmuseum. (Thanks to Chris Howlett who supplied this information.)
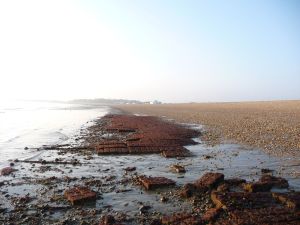
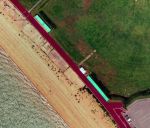
Caisson (Phoenix) at Stokes Bay, the one involved in the launching fatality (Stokes Bay pier can be seen in the background)
THE BRITISH ARMY IN THE UNITED KINGDOM 1939-1945© IWM (H 35554)
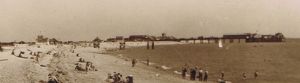
A view along Stokes Bay, Gosport, showing a few of the 14 concrete caissons for the Mulberry Harbours constructed at the site between 1943 and 1944. The caisson second from the camera has collapsed in its frame during launch.
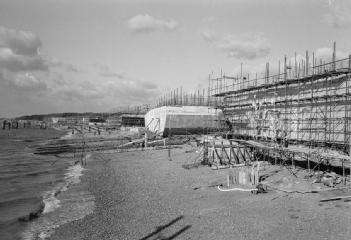
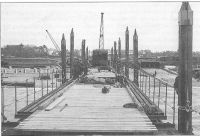
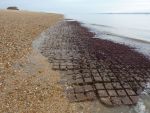
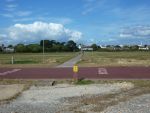
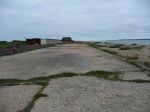
Launching slipway.
The fourteen Phoenix units constructed at Stokes Bay were side launched into the Solent down purpose built slipways.
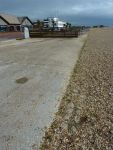
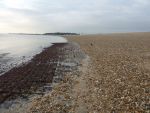
A slipway under construction at Stokes Bay. This is the western phoenix construction site.
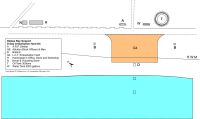
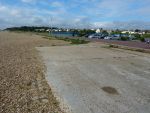
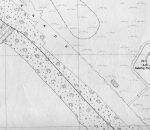
This map of 1952 shows the east slipway at Stokes Bay. Note the structure on the promenade that held the winch. Nothing remains of this, or the west slipway today.

East site Phoenix launching slipway at Stokes Bay.
Photographs show that at the east end of Stokes Bay sections of the composite piers and walkways were constructed. These were used to anchor the floating Phoenix units.
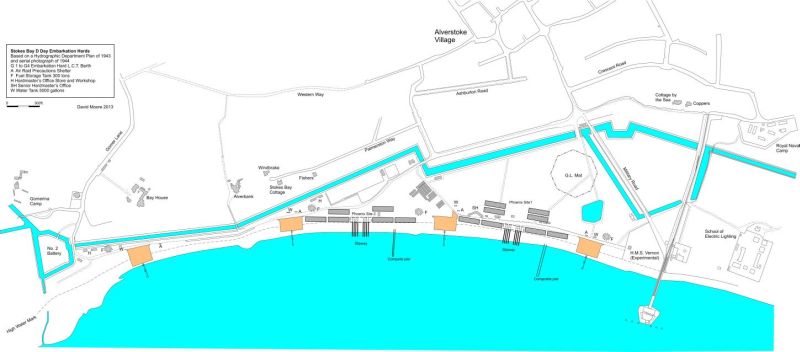
D-Day Embarkation Hards
Stokes Bay was designated as D-Day Embarkation Area Camp EAA4.
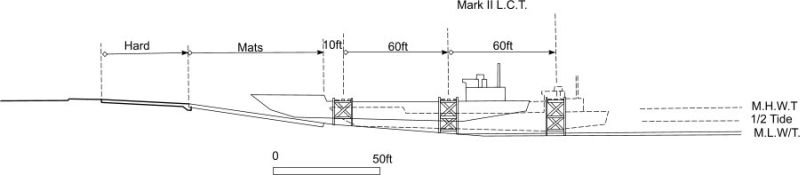
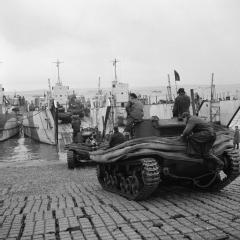
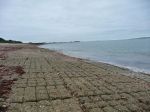
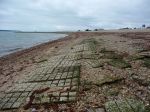
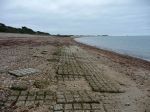
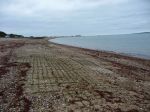
Four Embarkation Hards designated as G1 to G4, all for Landing Craft Tanks (L.C.T.) were constructed at Stokes Bay. These embarkation hards were numbered from west to east and the first two correspond with the car parks now in use along the Bay. G1 corresponds with the car park south of Bay House (SZ 589 988), G2 the next car park east of Alverbank (SZ 59296 98631), G3 south of Pebble Beach cafe (SZ 59647 98404) and G4, was between the D-Day Command Centre and Gosport and Fareham Inshore Rescue Station at the east end of the Bay (SZ 59951 98127). They were built by the Admiralty in 1942/3 under the control of Portsmouth Command in preparation for D-Day. Portsmouth Command controlled 22 sites in total. They were four-berth hards for landing craft (L.C.T. Hards). Each consisted of a concrete loading ramp equipped with three steel framed mooring points known as dolphins to anchor the craft during loading. The portion of the ramp extending to low water was made of flexible concrete matting resembling blocks of chocolate (5 blocks by 3 blocks), anchored to the concrete approach by steel hooks and spiked down using overlapping wire loops on each side. Each mat was 200feet wide by 73feet and was referred to as ‘flexible concrete mats’. The hards could be used for 12 hours in every 24 due to the heights of the tide.
The old Stokes Bay Pier had mooring points for L.C.H. (Landing Craft H.Q.) and Motor Launches.
After D Day LCTs acting as hospital ships discharged at the Gosport Hards.
The embarkation hards needed approach roads to accommodate the concentrated heavy traffic and transit areas for marshalling troops, vehicles and equipment. Some sources state that Jellicoe Avenue was widened to accommodate the huge volume of traffic, although this is disputed by others and the minutes of Gosport Borough Council for 29 October 1937 states clearly that this new road from Privett to Village Road was to be constructed 50ft wide. During World War Two the original part of Jellicoe Avenue (which had been laid out before the war started) was ‘knocked-through’ into the Stokes Bay military road (which became the southern part of Jellicoe Avenue) which was widened to 50-foot. Accommodation and ancillary buildings at the embarkation sites included offices for embarkation staff; a central Senior Hardmaster’s Office; a workshop for maintenance crew; stores; a watch hut and ablutions/latrines. Close to each of the four hards was a huge circular fuel oil tank for 300tons of fuel, with smaller water tanks holding 5,000 gallons each nearby. These piped fuel and water directly to each of the hards via the dophins. Dolphins were added to Stokes Bay pier to aid the mooring of ships for oiling.
Download D-Day embarkation Hards G1 to G4 and Phoenix sites plan as a High Quality PDF file
Hard G1
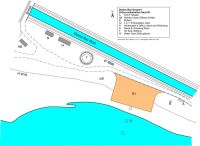
Hard G2
Hard G3
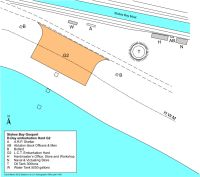
Hard G4
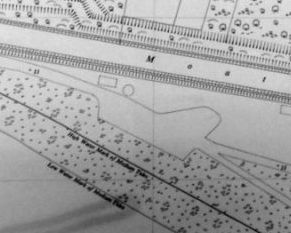
The foundations of the phoenix construction complex (hutments) can be seen to the left of the embarkation road on this plan of 1951. It is now a car park. Three dolphins for mooring the Landing Craft are marked in the sea. The dolphins were used by locals as diving platforms for many years after the War. Two of them were removed by Gosport Council in 1954 and the last one was removed in 1982. Further to the east is another slipway. Stokes Bay was de-requisitioned and returned to Gosport Council on 25 Dec 1951.
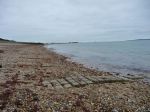
At low tide portions of embarkation hard G1 can be seen south of the promenade opposite Bay House. Locals refer to them as ‘ chocolate blocks’ because of their shape. They were broken up in 1949 but some were not removed.
Embarkation Hard G2 at Stokes Bay.

The top of embarkation hard G2 can be seen in the foreground of this view along the bay in 1954.
Blocks forming part of Embarkation Hard G3 can also be seen at the Pebble Beach Bistro.
At very low tide some of the ‘chocolate blocks’ that formed G4 can be seen on the water line. The concrete that formed the access to this embarkation hard can also be seen adjacent to the promenade. The section down the beach to the low water level has been removed.


Hard G4 fully exposed during a very low tide on 21 March 2011: Looking east.

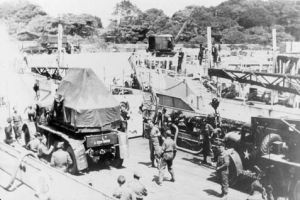
From slipways at Stokes Bay various vehicles were loaded into the transport craft to be taken to the Normandy beaches. This included at least 33 DUKW amphibious vehicles that were heading for a LSD (Landing Ship Dock) off Stokes Bay. Other vehicles included Duplex Drive tanks, Armoured Vehicles Royal Engineers, (A.V.R.E.) Self Propelled Artillery and Centaur tanks. Other vehicles listed on the embarkation schedules include Inns of Court Reg. 6th R.C.A. and First Priority vehicles.
The Myth of the Embankment to G4?
Bisecting the common at Stokes Bay is an earth embankment with a modern tarmac path joining Anglesey roundabout to the promenade. It was suggested by some that this embankment is clearly too wide to be necessary for the modern path and that the route of this embankment is the ideal one for vehicles to access D-Day embarkation Hard G4 from Anglesey Road. However Hydrographic Office plans of the D-Day hards at Stokes Bay do not show this embankment.
An aerial photograph of the bay taken in 1946 does not show the embankment. It is not shown on the O.S. map of 1945-46 updated in 1951 but is on the O.S. map of 1969 and an aerial view of 1965. Local residents who remember playing at the paddling pool in the post war years state that the embankment was not there until the 1960s. A reference in the Gosport Borough Council minutes to a new causeway constructed between Bay Road and the promenade by April 1952 probably refers to this causeway.

79th. Armoured Division (wikipedia article)
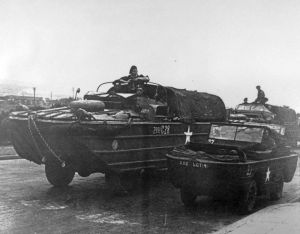
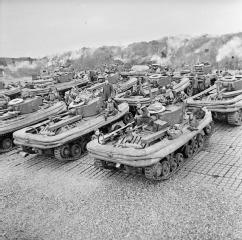
This special British Army Division was formed for the Normany landings. It operated armoured vehicles created for specialist roles to aid the landings, including the ‘swimming’ or ‘Donald Duck’ tanks (DD or Duplex Drive tanks). DD tanks worked by erecting a ‘flotation screen’ around the tank, which enabled it to float, and had a propeller powered by the tank’s engine to drive them in the water. They were part of ‘Hobart’s Funnies‘. The Valentine version was used only for training. The Specialised Armoured Development Establishment (S.A.D.E.) was the term applied to this unit that experimented with specialised tanks. The unit was later renamed as the “79th (Experimental) Armoured Division Royal Engineers”. The 79th’s vehicles were offered to all of the forces taking part in the landings of Operation Overlord, but the Americans declined all except the amphibious Sherman DD tank.
The Western end of Stokes Bay next to No.2 Battery and west of Bay House was the Salt Water Training School. Bay House was incorporated into this school. The ‘B’ instructional Wing of the 79th Armoured Division (British) was based here in October 1943 onwards. From January to May 1944 they perfected Sherman Duplex Drive Amphibious Tank loading and launch techniques. Over 30,000 launches were conducted as the Duplex Drive tank training came to a close in May 1944. A member of the 13/18 hussars reported that for training they travelled in Amphibious Tanks (Valentines were used for practice) across the Solent to the Isle of Wight landing at Osborne Bay. Each landing craft held a unit of nine valentines. The 79th Armoured Division were to be the spearhead of the assault on D-Day. A man working on the Phoenix units at Stokes Bay reported seeing men stripping down tanks, hundreds of them parked at the Bay, and then re-assembling them. He was told that they were being waterproofed. The tank park was built to the north of the Stokes Bay moat in the area that now forms the mobile home park to the east of No.2 Battery. Close by and south of Stokes Bay Road were two circular fuel storage tanks and south of this on the beach was a testing tank with ramps for running the tanks into to see if they were watertight. South of No.2 Battery were corrugated Nissen huts and a workshop. The Fresh Water Training School, Water Assault Wing A, was at Fritton Lake, Somerlayton in Norfolk. A fact sheet is available here: Fritton Lake British, Canadian and American tank divisions including the 13th/18th Royal Hussars (Queen Mary’s Own) trained here prior to D-Day.
Post D-Day and up to 1950 the school was closed but the facility continued in use as the Special Armament Development Establishment (S.A.D.E.) also based in nearby Fort Gomer. Amongst the vehicles that were tested was the D.U.K.W.
D = Date 1942 – the first year of manufacture.
U = Amphibian.
K = Drive to all wheels.
W= Dual rear axles.
THE BRITISH ARMY IN THE UNITED KINGDOM 1939-1945© IWM (H 35177)Amphibious, Duplextanks of B Wing, 79th Armoured Division School lined up on the hardened loading ramp at Stokes Bay, Gosport prior to embarking aboard an LCT during exercises.Foreground Mark V and behind Valentine Mark XI DD tanks wait with turrets reversed to back onto landing craft.
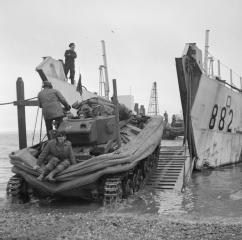
THE BRITISH ARMY IN THE UNITED KINGDOM 1939-45© IWM (H 35176)Valentine DD tank being reversed into a landing craft (LCT 882), 79th Armoured Division School, Gosport, 14 January 1944.
THE BRITISH ARMY IN THE UNITED KINGDOM 1939-1945© IWM (H 35175) Amphibious, Duplextanks of B Wing, 79th Armoured Division School driving on to LCT 782 at Stokes Bay, Gosport during exercises.
THE BRITISH ARMY IN THE UNITED KINGDOM 1939-45© IWM (H 35181)Valentine DD tank with screen erected, in the water alongside a landing craft, 79th Armoured Division School, Gosport, 14 January 1944.

THE BRITISH ARMY IN THE UNITED KINGDOM 1939-45© IWM (H 35169)Valentine DD tank with screen lowered, 79th Armoured Division School, Gosport, 14 January 1944. In the background can be seen the dry River Alver valley alongside Bay House.
Prior to the construction of a purpose built D-Day Command Centre at Stokes Bay, the Senior Hardmaster’s Office and telephone exchange was sited in the Bathing Station, together with messing facilities for 10 officers and 120 men for Hards G3 and G4.
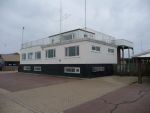
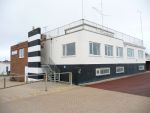
The D-day Control building was built to the immediate west of the bathing station and is still to be seen at Stokes Bay, modernised and incorporated into the H.Q. building of the Stokes Bay Sailing Club.
Canadian 10th Armoured Regiment.
On D-Day minus 2 (4th June 1944) The Canadian 10th Armoured Regiment, dispersed around Fort Gomer, was mobilised and loaded onto LCTs at G1 Stokes Bay. They loaded tanks, infantry carriers, anti-tank guns, trucks and jeeps. They were in the vanguard of the landings on Juno beach, part of the 2nd Canadian Armoured Brigade.
Exercise Fabius III
A pre D-Day exercise, codename Fabius III, was carried out at Stokes Bay during April and May 1944. In all there were six Fabius exercises which constituted the largest amphibious exercise in history. Fabius included four of the invasion assault forces and two major buildup forces that were to assault the Normandy beaches. Fabius III was the rehearsal for assault force J consisting of elements of the Canadian 3rd Infantry Division and and attached units which were to assault Juno beach. This force embarked at Southampton and Gosport and landed at Bracklesham Bay as part of the exercise. Fabius I II III and IV were carried out simultaneously.
HMS Porcupine.
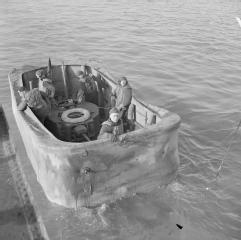
This ship, (which was in two sections after being torpedoed in the Mediterranean – both parts stayed afloat hence they were known as “Pork” (forward section) and “Pine” (aft section ). Pine was used as the Headquarters ship of Landing Craft Command at Stokes Bay from March 1943 to April 1946. After the war it was used for the storage of minor landing craft on shore. The ship itself was used for accommodation of crews of Landing Craft in Stokes Bay.
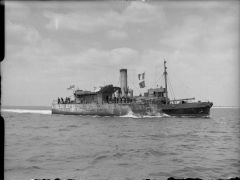
The stern half of HMS PORCUPINE being towed into Portsmouth by the tug SWARTHY after the ship had been split in two by a torpedo in the Mediterranean. The major portion of the ship eventually filled the role of Headquarters HQ ship of Landing Craft Command at Portsmouth.© IWM (A 17603) THE ROYAL NAVY DURING THE SECOND WORLD WAR.
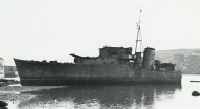
“Pork” – The forward section of HMS Porcupine.
A house in Palmerston Way called Windbrake was commandeered by the MOD to be used as part of HMS Porcupine. It was used in orchestrating the construction and transportation of the Mulberry Harbours from Stokes Bay, during the D-Day landings. Windbrake together with the nearby houses in Palmerston Way, ‘Stokes Bay Cottage’ and ‘Fishers’ accommodated 6 officers and 82 men for Hards G2 and G3. Two houses in Fort Road, @cottage by the Sea’ and ‘Coppers’ were commandeered to accommodate 6 officers and 76 men for Hard G4. 4 officers and 60 men for Hards G1 and G2 were accommodated in Gomerina Camp at the west end of the Bay.
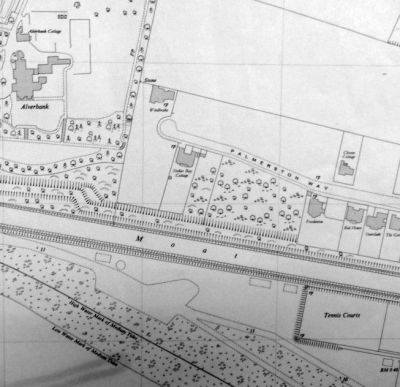
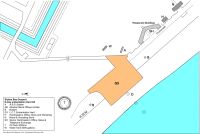
Hard G2 is at the bottom. The circle is the foundation for the fuel tank
serving that hard.
HMS Porcupine II
This was a Combined Operations Base and Hard Party School. (A ‘hard’ was a hard landing area on a beach) commissioned at Stokes Bay and Fort Gilkicker on 29/1/44, closed on 29/4/44 and placed on the disposal list 30/4/46.
More details here: H.M.S.Porcupine

Acknowledgements
Thanks to:
Chris Howlett who supplied valuable information and copies of D-Day embarkation hards plans at Stokes Bay from the United Kingdom Hydrographic Office.
Jean_Pierre Vanhoof for details of loading at the Embarkation Hards.
Andrew Whitmarsh of the D-Day Museum Southsea Portsmouth for arranging access to the archive material concerning Phoenix units at Stokes Bay.
Philip Ely who supplied explanatory information concerning many aspects of Stokes Bay and its buildings and roads.
More reading
Codename Mulberry: The Planning Building and Operation of the Normandy Harbours by Guy Hartup
Original page created by David Moore.